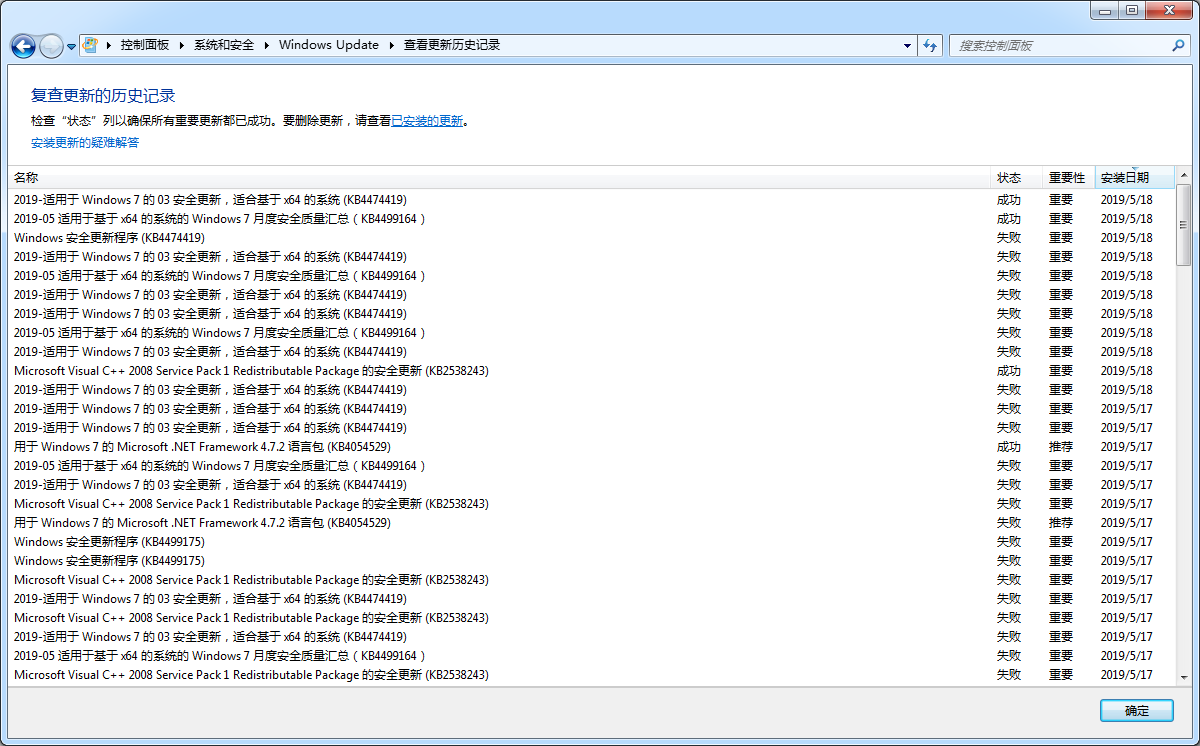
最近爆发Windows远程桌面服务漏洞(CVE-2019-0708)需要更新系统, 但是使用Windows Update更新补丁一直失败.

  为了查找问题所在, 开启了Windows Update详细日志, 不过在WindowsUpdate.log中只看到了失败报告, 具体原因不明, 在网上搜索时突然发现有CBS.log日志有详细 WU 安装相关记录, 果然在里面看到有错误报告

2019-05-18 19:07:10, Info                  CSI    0000005f Begin executing advanced installer phase 38 (0x00000026) index 41 (0x0000000000000029) (sequence 80)
    Old component: [ml:360{180},l:358{179}]"Microsoft-Windows-BootEnvironment-Core-MemoryDiagnostic, Culture=neutral, Version=6.1.7601.23471, PublicKeyToken=31bf3856ad364e35, ProcessorArchitecture=amd64, versionScope=NonSxS"
    New component: [ml:360{180},l:358{179}]"Microsoft-Windows-BootEnvironment-Core-MemoryDiagnostic, Culture=neutral, Version=6.1.7601.24382, PublicKeyToken=31bf3856ad364e35, ProcessorArchitecture=amd64, versionScope=NonSxS"
    Install mode: install
    Installer ID: {81a34a10-4256-436a-89d6-794b97ca407c}
    Installer name: [15]"Generic Command"
2019-05-18 19:07:10, Info                  CSI    00000060 Performing 1 operations; 1 are not lock/unlock and follow:
  LockComponentPath (10): flags: 0 comp: {l:16 b:5102f8d6690dd5012400000098056806} pathid: {l:16 b:5102f8d6690dd5012500000098056806} path: [l:238{119}]"\SystemRoot\WinSxS\amd64_microsoft-windows-b..re-memorydiagnostic_31bf3856ad364e35_6.1.7601.23471_none_36a0dee2348e195e" pid: 598 starttime: 132026512097178219 (0x01d50d69ca7c726b)
2019-05-18 19:07:10, Info                  CSI    00000061 Performing 1 operations; 1 are not lock/unlock and follow:
  LockComponentPath (10): flags: 0 comp: {l:16 b:5102f8d6690dd5012600000098056806} pathid: {l:16 b:5102f8d6690dd5012700000098056806} path: [l:238{119}]"\SystemRoot\WinSxS\amd64_microsoft-windows-b..re-memorydiagnostic_31bf3856ad364e35_6.1.7601.24382_none_3696f69234956b20" pid: 598 starttime: 132026512097178219 (0x01d50d69ca7c726b)
2019-05-18 19:07:10, Info                  CSI    00000062 Calling generic command executable (sequence 5): [20]"C:\Windows\bfsvc.exe"
    CmdLine: [47]""C:\Windows\bfsvc.exe" C:\Windows\boot /nofonts"
2019-05-18 19:07:10, Error      [0x018009] CSI    00000063 (F) Done with generic command 5; CreateProcess returned 0, CPAW returned S_OK
    Process exit code 15299 (0x00003bc3) resulted in success? FALSE
    Process output: [l:60 [60]"BFSVC: Failed to get system partition! Last Error = 0x3bc3

"][gle=0x80004005]
2019-05-18 19:07:10, Info                  CSI    00000064 Calling generic command executable (sequence 6): [24]"C:\Windows\fveupdate.exe"
    CmdLine: [35]""C:\Windows\fveupdate.exe" /memtest"
2019-05-18 19:07:10, Info                  CSI    00000065 Done with generic command 6; CreateProcess returned 0, CPAW returned S_OK
    Process exit code 0 resulted in success? TRUE
    Process output: [l:248 [248]"BitLockerUpdate: Running.

BitLockerUpdate: Service request is for memtest.exe.

BitLockerUpdate: BitLocker Drive Encryption is not turned ON on the OS volume.

BitLockerUpdate: No servicing was performed on the OS volume.

BitLockerUpdate: Done.

  其报告 “BFSVC: Failed to get system partition! Last Error = 0x3bc3” 错误, 具体是无法找到系统分区, 虽然是使用UEFI+GPT启动, 但是一直启动正常很是奇怪,使用PE对UEFI启动修复后重新安装补丁还是失败.

  后来想到之前是普通SATA3 M.2 SSD更换成NVMe SSD时, 由于主板只有一个M.2插槽, 使用了一块普通硬盘做中转, 即先是用GHOST把整个SSD克隆到普通SATA硬盘上, 关机后把NVMe SSD替换上M.2槽, 重新开机后把NVMe驱动装上, 再把普通SATA硬盘克隆回NVMe SSD并用PE UEFI修复启动后一直使用至今.

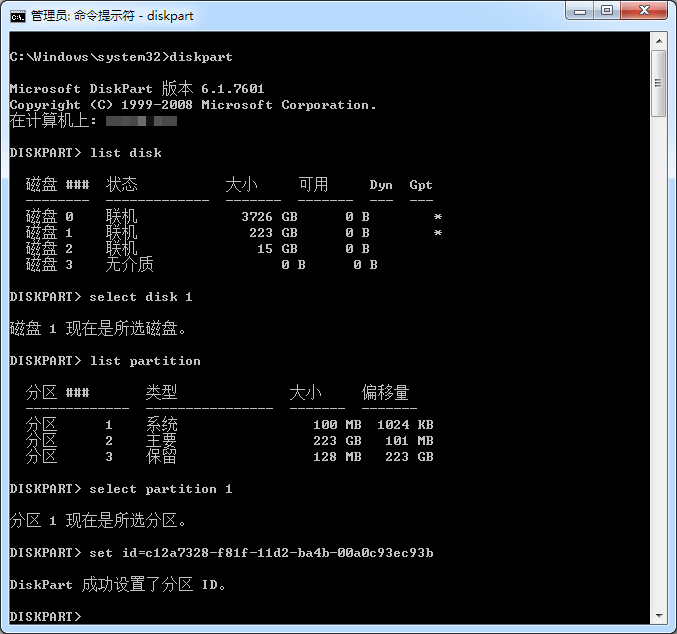
  现在虽然启动一切正常, 但是由于GPT的分区GUID未设置正确导致bfsvc.exe无法识别分区, 至此已经明白Windows Update为什么会更新失败了, 使用DiskPart重新设置回EFI启动ID.
DEFINE_GUID (PARTITION_SYSTEM_GUID, 0xC12A7328L, 0xF81F, 0x11D2, 0xBA, 0x4B, 0x00, 0xA0, 0xC9, 0x3E, 0xC9, 0x3B)
EFI: c12a7328-f81f-11d2-ba4b-00a0c93ec93b


1. 先在管理员CMD下启动 diskpart .
2. 使用 list disk 列出磁盘列表.
3. 根据具体硬盘使用 select disk 选中磁盘.
4. 再用 list partition 列出分区列表>
5. 根据具体启动分区使用 select partition 选中分区.
6. 最后使用 set id=c12a7328-f81f-11d2-ba4b-00a0c93ec93b 设置正确的EFI ID.

  最后再打上Windows Update更新补丁, 一切Ok.
ps1: Windows Update日志说明[https://docs.microsoft.com/zh-cn/windows/deployment/update/windows-update-logs]
ps2: 如何打开Windows Update详细日志[https://support.microsoft.com/en-us/help/2545723/how-to-enable-microsoft-installer-logging-and-verbose-logging-to-gathe]
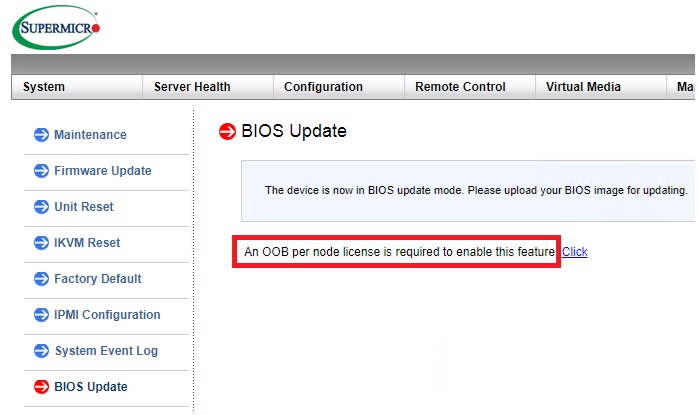
  最近入手一X11SCZ-F主板, 在其 Miscellaneous -> Activate License 需要输入 License ,搜索网上得知这个key在去年(2018年)被Peter Kleissner公开了生成算法twitter,用来方便用户更新BIOS。详细的文章在这里.

  就是使用MAC-SHA1-96 算法,对BMC的MAC码和 SECRET KEY: 85 44 E3 B4 7E CA 58 F9 58 30 43 F8 计算生成密码. MAC-SHA1-96表示利用MAC-SHA1计算,然后截取前96Bit。MAC- SHA1 的网站点这里.

  在linux下并安装了openssl, 可以直接计算:

echo -n 'bmc-mac' | xxd -r -p | openssl dgst -sha1 -mac HMAC -macopt hexkey:8544E3B47ECA58F9583043F8 | awk '{print $2}' | cut -c 1-24 

ps: bmc-mac 即IPMI BMC的MAC地址.

  详细文章如下: [来源: https://peterkleissner.com/2018/05/27/reverse-engineering-supermicro-ipmi/ ],来源网络 如有侵权 请联系删除.

Reverse Engineering Supermicro IPMI

May 27, 2018 | by Kleissner

Supermicro enforces a vendor-lock in on BIOS updates via IPMI, even though they publish the update files for free here. The only free alternative is to time-travel to 1995 and boot from a DOS disk to supply the update. All other options (including the Supermicro Server Manager) require a license.

They published BIOS updates to address Spectre and Meltdown vulnerabilities, yet make it almost impossible to actually perform the update. Even if you go their suggested way, buying a key from an authorized Supermicro reseller people on the internet report it’s difficult and time consuming getting them. I was quoted 25 EUR and an estimated 2 weeks delivery time.

You buy a brand new product, it has a known vulnerability and you should pay for the update?! This is simply NOT acceptable. As the owner of my device I shall be free to update it. Therefore, I spent exactly 1 night reverse engineering this thing to figure out the license key algorithm. tl;dr here is the algorithm to generate those license keys:

MAC-SHA1-96(INPUT: MAC address of BMC, SECRET KEY: 85 44 E3 B4 7E CA 58 F9 58 30 43 F8)

Anybody can create the license key on https://cryptii.com/ by typing on the left side (select Bytes) the MAC address of the IPMI (the BMC), select in the middle HMAC and SHA-1, enter the secret key and on the right side the License Key will appear!

This was successfully tested with Supermicro mainboards from 2013-2018. It appears they have not changed the algorithm and use the same “secret”. The first 6 groups go in here:

Update 1/14/2019: The Twitter user @astraleureka posted this code perl code which is generating the license key:

#!/usr/bin/perl
use strict;
use Digest::HMAC_SHA1 'hmac_sha1';
my $key  = "\x85\x44\xe3\xb4\x7e\xca\x58\xf9\x58\x30\x43\xf8";
my $mac  = shift || die 'args: mac-addr (i.e. 00:25:90:cd:26:da)';
my $data = join '', map { chr hex $_ } split ':', $mac;
my $raw  = hmac_sha1($data, $key);
printf "%02lX%02lX-%02lX%02lX-%02lX%02lX-%02lX%02lX-%02lX%02lX-%02lX%02lX\n", (map { ord $_ } split '', $raw);

Update 3/27/2019: There is also Linux shell version that uses openssl:

echo -n 'bmc-mac' | xxd -r -p | openssl dgst -sha1 -mac HMAC -macopt hexkey:8544E3B47ECA58F9583043F8 | awk '{print $2}' | cut -c 1-24
Information about IPMI (skip this if you’re an expert)

The IPMI is a remote management mechanism of servers, embedded in a chip that is separated from the typical resources accessible by the operating system. It allows remote management of servers even when it’s turned off. It’s really useful when your server is not responding and you don’t to want or can’t physically go there to troubleshoot. You can even install an OS via IPMI, start the server & even go into the BIOS. Thanks to HTML5 Supermicro switched away from those old Java applets (anyone developing anything in Java should be banned to a far, far remote island; Java should die in a fire, it’s slow and has 9999 vulnerabilities and on top of that Oracle will go after you for trademark and patent troll reasons even though it’s open source).

References that helped

I want to point out previous research work which helped me a lot.

Step 1: Download & Extract the Firmware

Supermicro offers the IPMI update files for free on their website. You need to select your mainboard and download the IPMI update file. Among other files it will contain 1 large firmware blob, in this case “REDFISH_X10_366.bin”.

The tool binwalk will scan the binary and look for signatures of known formats:

HEXADECIMAL DESCRIPTION
--------------------------------------------------------------------
0x19300 CRC32 polynomial table, little endian
0x400000 CramFS filesystem, little endian, size: 14254080, version 2, sorted_dirs, CRC 0xF105D0D5, edition 0, 8088 blocks, 1086 files
0x1400000 uImage header, header size: 64 bytes, header CRC: 0x8290B85A, created: 2017-06-09 12:33:02, image size: 1537474 bytes, Data Address: 0x40008000, Entry Point: 0x40008000, AA328F72, OS: Linux, CPU: ARM, image type: OS Kernel Image, compression type: gzip, image name: "21400000"
0x1400040 gzip compressed data, maximum compression, has original file name: "linux.bin", from Unix, last modified: 2017-06-09 12:01:11
0x1700000 CramFS filesystem, little endian, size: 7507968, version 2, sorted_dirs, CRC 0x19806BFF, edition 0, 2973 blocks, 407 files

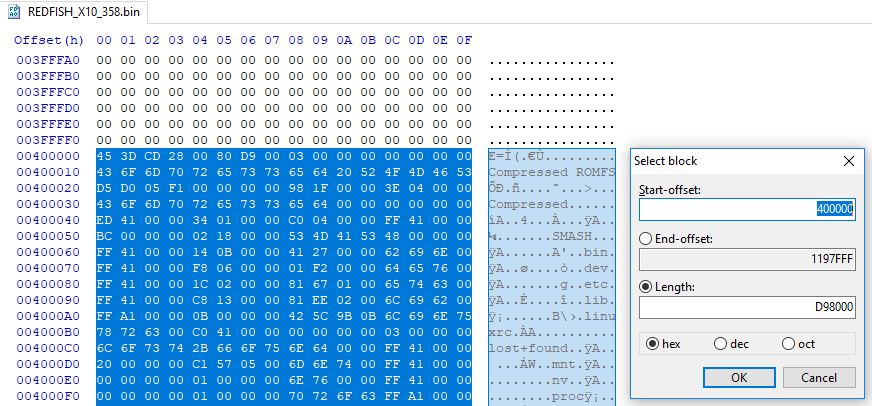
Use a hex editor (such as HxD) to extract the CramFS binaries and store them to new files. It is an embedded compressed Linux file system that contains the files that we are interested in.

Next get a Linux system and mount both files each with this command and then dump all files into a tar file:

mount -o loop -t cramfs extracted.bin mnt1
tar -czf mnt1.tar.gz mnt1

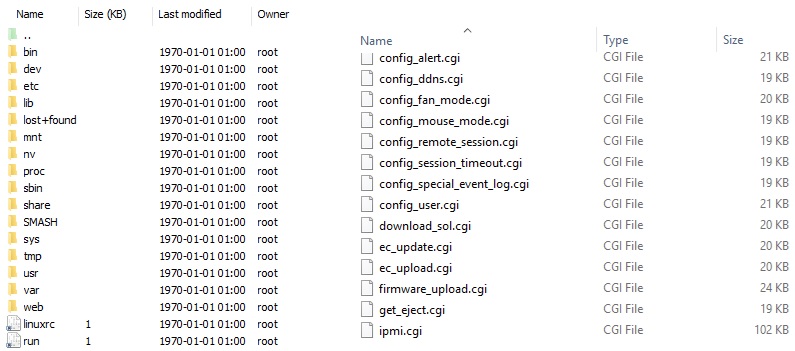
Congrats! You now have the actual files of the IPMI system.

Step 2: Reverse engineer the interesting files on the IPMI file system

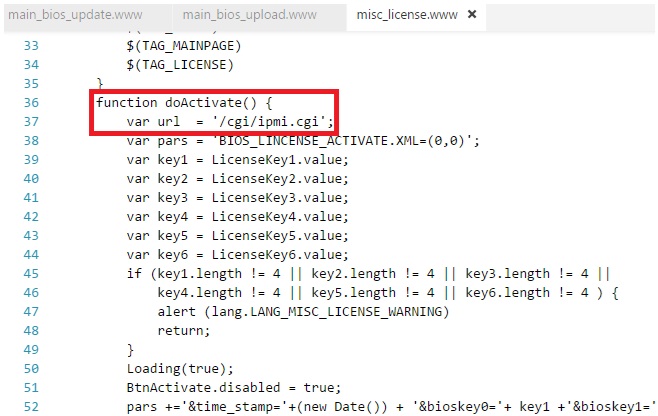
Finding the HTML/JS code that provides the user interface for activation was easy: Use the browser’s built-in developer tools (F12) to look at the code, then look for the same code on the extracted IPMI file system.

As you can see below, the IPMI website (that you visit as system administrator) calls “/cgi/ipmi.cgi” with certain parameters for checking if the key is valid.

Here are the breadcrumbs I followed from the website part:

The response is XML with check set to 0 if invalid and 1 if valid (it’s weird that they do not use JSON instead):

Next, we need to use IDA Pro and open the file “ipmi.cgi” that is stored on the IPMI file system and that we extracted in the previous step. Below you can see the code that handles the license check. By reading this code, you can see how the license is supposed to look like. The first loop is hex-decoding the input, i.e. The text key “1234-00FF-0000-0000-0000-0000” becomes binary (12 bytes) 12 34 00 FF 00 00 00 00 00 00 00 00.

The actual check of the license is done in another file “libipmi.so” which implements the referenced function oob_format_license_activate:

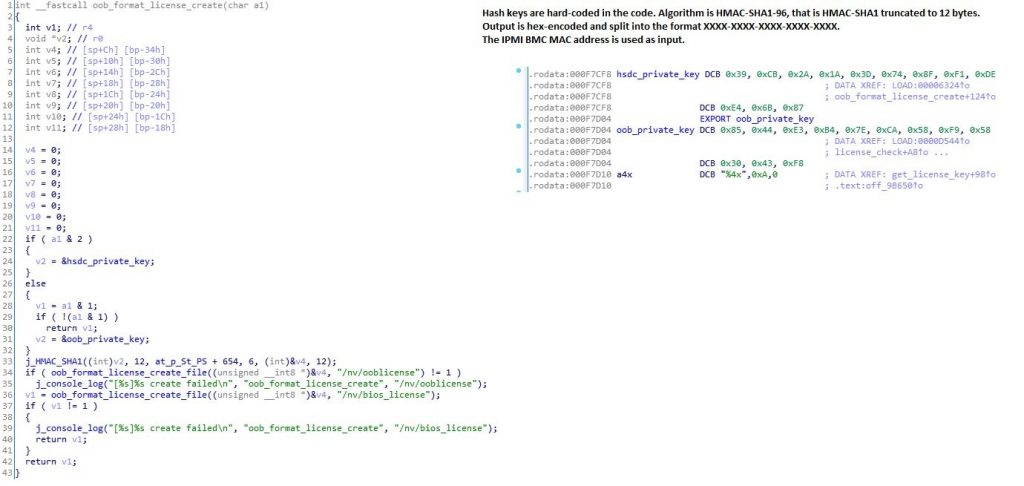
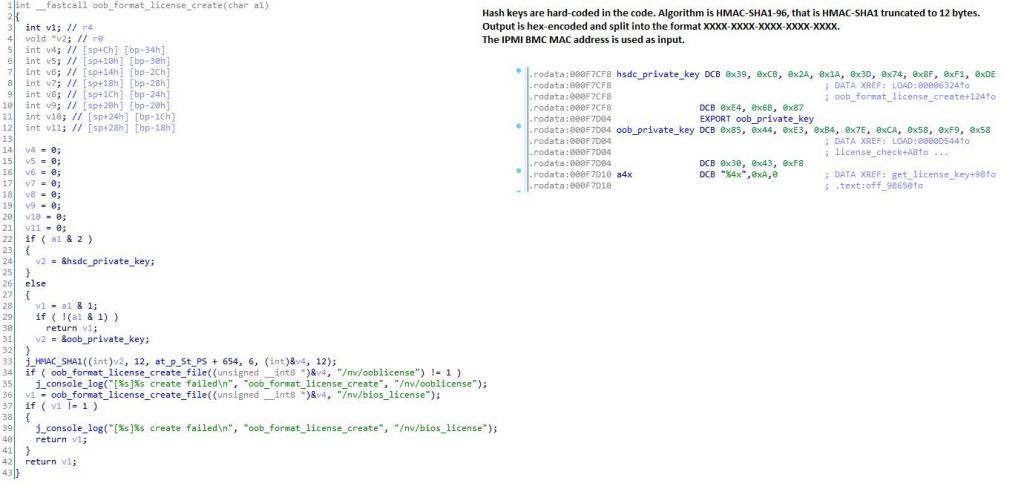
You can see here already the actual license key algorithm referenced – HMAC_SHA1. It is important to notice the 12 in the function call, which means 96 bits. The 96 bits is exactly the length of the key, represented in hex to the end-user.

Interestingly there is a function “oob_format_license_create” which creates the license and is even easier to read. You can see directly the reference to the private keys. “oob” means out-of-band which is OEM talk meaning here remotely purchased license key (though there’s nothing remote about this function).

The Supermicro keys are:

HSDC Private Key: 39 CB 2A 1A 3D 74 8F F1 DE E4 6B 87

OOB Private Key: 85 44 E3 B4 7E CA 58 F9 58 30 43 F8

At the beginning of this blog post it is explained how you can easily use this to create your own Supermicro License Key.