| 至强系列/代次 | 发布时间 | 插槽 (Socket) | 芯片组 (Chipset) | 架构代号 (Microarchitecture) | 对应桌面酷睿代数 |
|---|---|---|---|---|---|
| Pentium III Xeon (第一代) | 1998-1999 | Slot 2 | Intel 440GX | P6 (Deschutes, Tanner) | Pentium III |
| Pentium III Xeon (第二代) | 1999-2000 | Slot 2 | Intel 450NX | P6 (Cascades) | Pentium III |
| Xeon (NetBurst – Foster) | 2001-2002 | Socket 603 | Intel 860, E7500/E7501 | NetBurst (Foster) | Pentium 4 (Willamette) |
| Xeon (NetBurst – Prestonia) | 2002-2003 | Socket 603 | E7500/E7501, E7505 | NetBurst (Prestonia) | Pentium 4 (Northwood) |
| Xeon DP (NetBurst – Nocona) | 2004 | Socket 604 | E7520/E7525, E8500 | NetBurst (Nocona, Irwindale) | Pentium 4 (Prescott) |
| Xeon MP (NetBurst – Potomac) | 2005 | Socket 604 | E8500, E8501 | NetBurst (Potomac) | Pentium 4 (Prescott) |
| Xeon DP (NetBurst – Paxville DP) | 2005-2006 | Socket 604 | E7520/E7525, E8500 | NetBurst (Paxville DP) | Pentium D (Smithfield) |
| Xeon MP (NetBurst – Paxville MP) | 2005-2006 | Socket 604 | E8500, E8501 | NetBurst (Paxville MP) | Pentium D (Smithfield) |
| Xeon (NetBurst – Dempsey) | 2006 | Socket 771 (LGA771) | Intel 5000P/X/V | NetBurst (Dempsey) | Pentium D (Presler) |
| Xeon (Core – Woodcrest) | 2006 | Socket 771 (LGA771) | Intel 5000P/X/V | Core (Woodcrest) | Core 2 Duo (Conroe) |
| Xeon (Core – Clovertown) | 2006-2007 | Socket 771 (LGA771) | Intel 5000P/X/V | Core (Clovertown) | Core 2 Quad (Kentsfield) |
| Xeon (Core – Tigerton) | 2007 | Socket 771 (LGA771) | Intel 7300 | Core (Tigerton) | Core 2 Quad (Kentsfield) |
| Xeon (Nehalem – Gainestown) | 2008-2009 | LGA1366 | Intel 5500/5520 | Nehalem (Gainestown) | Core i7-9xx (Bloomfield) |
| Xeon (Nehalem – Beckton) | 2010 | LGA1567 | Intel 7500 | Nehalem (Beckton) | Core i7-9xx (Bloomfield) |
| Xeon (Westmere – Gulftown) | 2010 | LGA1366 | Intel 5500/5520 | Westmere (Gulftown) | Core i7-980X (Gulftown) |
| Xeon (Westmere – Westmere-EX) | 2011 | LGA1567 | Intel 7500 | Westmere (Westmere-EX) | Core i7-980X (Gulftown) |
| Xeon E3 (Sandy Bridge) | 2011-2012 | LGA1155 | C202/C204/C206 | Sandy Bridge | Core 2nd Gen (i3/i5/i7-2xxx) |
| Xeon E5/E7 (Sandy Bridge-EP) | 2012 | LGA2011 | C602/C604/C606 | Sandy Bridge-EP | Core 2nd Gen (i7-38xx/39xx) |
| Xeon E3 (Ivy Bridge) | 2012-2013 | LGA1155 | C216 | Ivy Bridge | Core 3rd Gen (i3/i5/i7-3xxx) |
| Xeon E5/E7 (Ivy Bridge-EP) | 2013-2014 | LGA2011 | C602/C604/C606 | Ivy Bridge-EP | Core 3rd Gen (i7-48xx/49xx) |
| Xeon E3 (Haswell) | 2013-2014 | LGA1150 | C226 | Haswell | Core 4th Gen (i3/i5/i7-4xxx) |
| Xeon E5/E7 (Haswell-EP) | 2014-2015 | LGA2011-v3 | C612 | Haswell-EP | Core 4th Gen (i7-58xx/59xx) |
| Xeon E3 (Broadwell) | 2015 | LGA1150 | C236 | Broadwell | Core 5th Gen (i5/i7-5xxx) |
| Xeon E5/E7 (Broadwell-EP) | 2016 | LGA2011-v3 | C612 | Broadwell-EP | Core 5th Gen (i7-68xx/69xx) |
| Xeon E3 (Skylake) | 2016-2017 | LGA1151 | C232/C236 | Skylake | Core 6th Gen (i3/i5/i7-6xxx) |
| Xeon Scalable 1st Gen (Skylake-SP) | 2017-2018 | LGA3647 | C62x (Lewisburg) | Skylake-SP | Core 7th Gen (Kaby Lake) |
| Xeon Scalable 2nd Gen (Cascade Lake) | 2019 | LGA3647 | C62x (Lewisburg) | Cascade Lake | Core 9th Gen (Coffee Lake) |
| Xeon W-22xx (Cascade Lake) | 2019 | LGA2066 | C422/X299 | Cascade Lake | Core 10th Gen (Comet Lake) |
| Xeon Scalable 3rd Gen (Ice Lake-SP) | 2021 | LGA4189 | C621A/C627A | Ice Lake-SP | Core 10th Gen (Comet Lake) |
| Xeon Scalable 4th Gen (Sapphire Rapids) | 2023 (Q1) | LGA4677 | C62xA/C741 (Eagle Stream) | Sapphire Rapids | Core 12th Gen (Alder Lake) |
| Xeon Scalable 5th Gen (Emerald Rapids) | 2023 (Q4) | LGA4677 | C741 (Eagle Stream) | Emerald Rapids | Core 13th Gen (Raptor Lake) |
| Xeon 6 (Sierra Forest – E-cores) | 2024 (Q2) | LGA7700 (Birch Stream) | C741 | Sierra Forest (E-cores) | Core 14th Gen (Raptor Lake Refresh) |
| Xeon 6 (Granite Rapids – P-cores) | 2024 (Q3) | LGA7700 (Birch Stream) | C741 | Granite Rapids (P-cores) | Core Ultra 2nd Gen (Arrow Lake/Lunar Lake) |
| Xeon 6 (Clearwater Forest – E-cores) | 2025 (预计) | LGA7700 (Birch Stream) | C741 | Clearwater Forest (E-cores) | Core Ultra 3rd Gen (预计) |
分类: 大杂烩
阿里云/腾讯云等VPS重装Rocky Linux 10的步骤
先要装一个旧版本的Centos 7.9,然后开始新装系统
步骤 1: 使用 GParted 分割现有分区
工具选择:GParted 是图形化分区工具,支持在线分区操作,适合 Linux 系统。
操作步骤:
- 下载 GParted Live:
# cd /mnt # wget https://sourceforge.net/projects/gparted/files/gparted-live-stable/1.7.0-12/gparted-live-1.7.0-12-amd64.iso - 使用GRUB将GParted Live安装到硬盘,创建 grub2 自定义文件
/etc/grub.d/40_custom,内容如下:menuentry "Gparted live" { set isofile="/mnt/gparted-live-1.7.0-12-amd64.iso" loopback loop $isofile linux (loop)/live/vmlinuz boot=live config union=overlay username=user components noswap noeject vga=788 ip= net.ifnames=0 toram=filesystem.squashfs findiso=$isofile initrd (loop)/live/initrd.img } - 更新您的 grub2 配置:
# grub2-mkconfig -o /boot/grub2/grub.cfg - 分区操作(尽量将iso安装分区弄到最后一个分区,也就是分区4):
- 选择要分割的主分区(如
/dev/sda2)。 - 右键点击分区 → Resize/Move。
- 调整分区大小,释放出至少 2GB 未分配空间。
- 点击 Resize/Move → Apply。
- 重启
- 选择要分割的主分区(如
- 格式化新分区并挂载:
mkfs.ext4 /dev/vda4 # 格式化为 ext4 文件系统
mkdir /mnt/iso_install
mount /dev/vda4 /mnt/iso_install
步骤 2: 分配目录并下载 ISO 文件
将 Rocky Linux 10 的 ISO 镜像下载到刚刚创建的新分区挂载点。
- 下载 ISO:
cd /mnt/iso_install
# 请确认 Rocky Linux 10.1 已正式发布,目前最新版可能是 10 Beta 或其他版本。
# 假设该链接有效:
wget https://download.rockylinux.org/pub/rocky/10/isos/x86_64/Rocky-10.1-x86_64-minimal.iso
步骤 3: 修改 GRUB 启动 ISO
这是最复杂且最容易出错的一步。您需要修改当前系统的引导加载程序 GRUB,使其在下次启动时引导 ISO 文件中的安装内核,而不是当前系统。
定位 GRUB 配置文件: 通常在 /etc/default/grub 或 /boot/grub/grub.cfg。
创建自定义 GRUB 配置条目:
- 使用lsblk获得uuid, 使用fdisk获得分区类型(msdos或者gpt)以及第几分区:
# lsblk -f NAME FSTYPE LABEL UUID MOUNTPOINT vda ├─vda1 ext4 c8b5b2da-5565-4dc1-b002-2a8b07573e22 / ├─vda2 ext4 8f0484e1-9f99-4932-8639-1fcb32417376 ├─vda3 ext4 3556fbff-c61b-4e9c-864c-dc5c1d772277 └─vda4 ext4 e15d6a20-ac3e-4385-a784-2914ab270a85 /mnt/iso_install # fdisk -l Disk /dev/vda: 42.9 GB, 42949672960 bytes, 83886080 sectors Units = sectors of 1 * 512 = 512 bytes Sector size (logical/physical): 512 bytes / 512 bytes I/O size (minimum/optimal): 512 bytes / 512 bytes Disk label type: dos Disk identifier: 0x000edc45 Device Boot Start End Blocks Id System /dev/vda1 * 2048 79691775 39844864 83 Linux /dev/vda2 79691776 79693823 1024 83 Linux /dev/vda3 79693824 79695871 1024 83 Linux /dev/vda4 79695872 83886079 2095104 83 Linux - 在
/etc/grub.d/40_custom文件末尾添加一个新的启动项。vi /etc/grub.d/40_custom - 添加以下内容(根据您的分区和 ISO 文件名调整, 新分区的 UUID,并替换上述 [YOUR_VDA4_UUID]):
menuentry "Install Rocky Linux 10 via ISO Final" { set isofile="/Rocky-10.1-x86_64-minimal.iso" # 查找 UUID 为 [YOUR_VDA4_UUID] 的分区 search --no-floppy --fs-uuid [YOUR_VDA4_UUID] --set=root # 挂载 ISO 文件 loopback loop ($root)$isofile # !! 使用正确的路径 /images/pxeboot/vmlinuz !! # inst.stage2 参数告诉安装程序去哪里找安装文件 linux (loop)/images/pxeboot/vmlinuz inst.stage2=hd:UUID=[YOUR_VDA4_UUID]:/ rhgb quiet # !! 使用正确的路径 /images/pxeboot/initrd.img !! initrd (loop)/images/pxeboot/initrd.img } - 更新 GRUB 配置: 运行命令生成新的 grub.cfg。
grub2-mkconfig -o /boot/grub2/grub.cfg # 如果您的系统使用旧版 GRUB: update-grub - 重启 VPS
reboot
进入安装界面: 重启后,您通常需要通过 VPS 提供商的 VNC 或 Web 控制台快速进入 GRUB 菜单,选择您刚刚添加的 “Install Rocky Linux 10 via ISO” 选项。
执行安装: 按照 Rocky Linux 安装程序的提示进行安装。在分区步骤,确保您将旧的系统分区格式化,并正确配置新的挂载点。
步骤 4: 回收 ISO 分区
- 使用 fdisk 删除 vda4 并创建新的 Swap 分区
# fdisk /dev/vda Welcome to fdisk (util-linux 2.40.2). Changes will remain in memory only, until you decide to write them. Be careful before using the write command. This disk is currently in use - repartitioning is probably a bad idea. It's recommended to umount all file systems, and swapoff all swap partitions on this disk. Command (m for help): p Disk /dev/vda: 40 GiB, 42949672960 bytes, 83886080 sectors Units: sectors of 1 * 512 = 512 bytes Sector size (logical/physical): 512 bytes / 512 bytes I/O size (minimum/optimal): 512 bytes / 512 bytes Disklabel type: dos Disk identifier: 0x000edc45 Device Boot Start End Sectors Size Id Type /dev/vda1 * 2048 2099199 2097152 1G 83 Linux /dev/vda2 2099200 71723007 69623808 33.2G 83 Linux /dev/vda4 79695872 83886079 4190208 2G 83 Linux Command (m for help): d Partition number (1,2,4, default 4): 4 Partition 4 has been deleted. Command (m for help): p Disk /dev/vda: 40 GiB, 42949672960 bytes, 83886080 sectors Units: sectors of 1 * 512 = 512 bytes Sector size (logical/physical): 512 bytes / 512 bytes I/O size (minimum/optimal): 512 bytes / 512 bytes Disklabel type: dos Disk identifier: 0x000edc45 Device Boot Start End Sectors Size Id Type /dev/vda1 * 2048 2099199 2097152 1G 83 Linux /dev/vda2 2099200 71723007 69623808 33.2G 83 Linux Command (m for help): n Partition type p primary (2 primary, 0 extended, 2 free) e extended (container for logical partitions) Select (default p): p Partition number (3,4, default 3): First sector (71723008-83886079, default 71723008): 75916900 Last sector, +/-sectors or +/-size{K,M,G,T,P} (75916900-83886079, default 83886079): Created a new partition 3 of type 'Linux' and of size 3.8 GiB. Command (m for help): t Partition number (1-3, default 3): Hex code or alias (type L to list all): 82 Changed type of partition 'Linux' to 'Linux swap / Solaris'. Command (m for help): w The partition table has been altered. Syncing disks. - 重启系统
分区表修改后,您必须重启系统才能使内核识别新的分区布局。
reboot重启后,通过 VNC 重新连接。
- 格式化并启用 Swap 分区
现在
/dev/vda3应该是一个 Swap 分区了。mkswap /dev/vda3 swapon /dev/vda3 - 永久挂载 Swap
编辑
/etc/fstab文件,使 Swap 在每次启动时自动挂载。vi /etc/fstab在文件末尾添加以下行:
/dev/vda3 swap swap defaults 0 0 - 扩展 vda2 文件系统(最复杂的一步)
# fdisk /dev/vda

Welcome to fdisk (util-linux 2.40.2).
Changes will remain in memory only, until you decide to write them.
Be careful before using the write command.

This disk is currently in use - repartitioning is probably a bad idea.
It's recommended to umount all file systems, and swapoff all swap
partitions on this disk.

Command (m for help): p

Disk /dev/vda: 40 GiB, 42949672960 bytes, 83886080 sectors
Units: sectors of 1 * 512 = 512 bytes
Sector size (logical/physical): 512 bytes / 512 bytes
I/O size (minimum/optimal): 512 bytes / 512 bytes
Disklabel type: dos
Disk identifier: 0x000edc45

Device     Boot    Start      End  Sectors  Size Id Type
/dev/vda1  *        2048  2099199  2097152    1G 83 Linux
/dev/vda2        2099200 71723007 69623808 33.2G 83 Linux
/dev/vda3       75916900 83886079  7969180  3.8G 82 Linux swap / Solaris

Command (m for help): e
Partition number (1-3, default 3): 2

New <size>{K,M,G,T,P} in bytes or <size>S in sectors (default 35.2G):

Partition 2 has been resized.

Command (m for help): p
Disk /dev/vda: 40 GiB, 42949672960 bytes, 83886080 sectors
Units: sectors of 1 * 512 = 512 bytes
Sector size (logical/physical): 512 bytes / 512 bytes
I/O size (minimum/optimal): 512 bytes / 512 bytes
Disklabel type: dos
Disk identifier: 0x000edc45

Device     Boot    Start      End  Sectors  Size Id Type
/dev/vda1  *        2048  2099199  2097152    1G 83 Linux
/dev/vda2        2099200 75916899 73817700 35.2G 83 Linux
/dev/vda3       75916900 83886079  7969180  3.8G 82 Linux swap / Solaris

Command (m for help): F

Unpartitioned space /dev/vda: 0 B, 0 bytes, 0 sectors
Units: sectors of 1 * 512 = 512 bytes
Sector size (logical/physical): 512 bytes / 512 bytes

Command (m for help): w
The partition table has been altered.
Syncing disks.

# 扩展文件系统到最大可用空间
sudo xfs_growfs /dev/vda2

#  验证扩容结果
df -hT /dev/vda2
文件系统       类型  大小  已用  可用 已用% 挂载点
/dev/vda2      xfs    36G  1.8G   34G    6% /
至此全新Rocky Linux 10已经安装完毕,剩下就是标准配置了.
【转发】解决win10输入法卡顿问题
问题:
解决win10输入法卡顿问题, 即在输入中文时ctfmon.exe进程CPU占用率25%以上,几乎无法输入文字.
卡顿原因:
用户的输入法配置文件由于各种原因出现了错误或损坏导致的,只好直接删除让输入法重新建一个了。另外删除后应该会删掉用户个人的词频调整配置
解决方法:
找到自己的输入法的本地词库及配置文件目录,C:\Users\用户名\AppData\Roaming\Microsoft\InputMethod\Chs;将整个Chs文件夹删除重启即可。
[来源]https://blog.csdn.net/cg_speech/article/details/105322592
Rocky Linux 9.6 下配置 LSI MegaRAID SNMP 代理
先安装SAS IR SNMP包
$ sudo dnf install sas_ir_snmp
然后启动服务并添加开机启动
$ sudo chkconfig lsi_mrdsnmpd on
$ sudo /etc/init.d/lsi_mrdsnmpd start
正在启动 lsi_mrdsnmpd (via systemctl):                    [  确定  ]
确保已经添加lsi snmp代理
$ sudo vi /etc/snmp/snmpd.conf

#  See the snmpd.conf manual page, and the output of "snmpd -H".
pass .1.3.6.1.4.1.3582 /usr/sbin/lsi_mrdsnmpmain
我们使用snmpwalk来检查安装情况,但是这里无输出
$ snmpwalk localhost -v 2c -c public .1.3.6.1.4.1.3582
SNMPv2-SMI::enterprises.3582 = No Such Instance currently exists at this OID
检查错误日志可以看到lsi_mrdsnmpmain无法访问共享内存
$ sudo vi /var/log/messages
Jul  9 02:56:52 CC-Server journal[2039141]: MegaRAID SNMP AGENT: Error in attaching the shared memory(lsi_mrdsnmpmain)
Jul  9 02:56:52 CC-Server lsi_mrdsnmpmain[2039142]: MegaRAID SNMP AGENT: Error in attaching the shared memory(lsi_mrdsnmpmain)
究其原因是lsi_mrdsnmpagent和snmpd服务虽然是root用户启动的,然而lsi_mrdsnmpmain的可执行文件标签和snmpd并不一样,一个是默认的开机程序initrc_t,另一个则是snmpd_t
$ ps auxZ|grep snmp
system_u:system_r:snmpd_t:s0    root     1963356  0.0  0.0  25212 14464 ?        Ss   7月08   0:28 /usr/sbin/snmpd -LS0-6d -f
system_u:system_r:initrc_t:s0   root     2046119  0.0  0.0  42276 16336 ?        Ssl  03:33   0:00 /usr/sbin/lsi_mrdsnmpagent -c /etc/snmp/snmpd.conf
system_u:system_r:initrc_t:s0   root     2046121  0.0  0.0   8816  1900 ?        Ss   03:33   0:00 /usr/sbin/lsi_mrdsnmpagent -c /etc/snmp/snmpd.conf
但是这里把initrc_t改成snmpd_t并不是好办法,因为snmpd_t属于受限组如果用它需要改很多selinux配置, 毕竟lsi_mrdsnmpagent本身需要访问硬件设备,需要的权限更高。最终我们制作一个政策包文件,使snmpd_t允许访问initrc_t的共享内存。
# vi lsi_mrdsnmpmain.te

module lsi_mrdsnmpmain 1.0;

require {
        type initrc_t;
        type snmpd_t;
        class shm { associate read unix_read unix_write write };
}

#============= snmpd_t ==============

#!!!! This avc is allowed in the current policy
allow snmpd_t initrc_t:shm { associate unix_read unix_write };

#!!!! This avc has a dontaudit rule in the current policy
allow snmpd_t initrc_t:shm { read write };
编译.te文件并导入
# 生成模块文件
checkmodule -M -m -o lsi_mrdsnmpmain.mod lsi_mrdsnmpmain.te
# 生成政策包文件
semodule_package -o lsi_mrdsnmpmain.pp -m lsi_mrdsnmpmain.mod
# 最终导入政策包文件
semodule -i lsi_mrdsnmpmain.pp
然后重启lsi_mrdsnmpagent服务就可以完整访问snmp了
# 重启lsi_mrdsnmpd服务
sudo service lsi_mrdsnmpd restart

# 测试访问snmp的lsi OID
snmpwalk localhost -v 2c -c public .1.3.6.1.4.1.3582
SNMPv2-SMI::enterprises.3582.4.1.1.0 = STRING: "CC-Server"
SNMPv2-SMI::enterprises.3582.4.1.2.0 = STRING: "Rocky Linux release 9.6 (Blue Onyx)x86_64"
SNMPv2-SMI::enterprises.3582.4.1.3.1.0 = STRING: "1.42-01"
SNMPv2-SMI::enterprises.3582.4.1.3.2.0 = STRING: "lsi_mrdsnmpagent"
SNMPv2-SMI::enterprises.3582.4.1.3.3.0 = STRING: "3.18.0.5"
SNMPv2-SMI::enterprises.3582.4.1.3.4.0 = STRING: "21st January, 2013"
SNMPv2-SMI::enterprises.3582.4.1.4.1.1.0 = INTEGER: 1
Windows 10/11远程控制超微X9DR3-F主板
超微X9DR3-F主板是支持IPMI的,但是由于是早期主板并不支持HTML5远程控制,只支持JAVA JNLP方式访问, 对于最新Windows 10/11系统无法直接使用, 必须先开启Internet Explorer浏览器, 还得安装Java SE运行环境, 具体操作如下.
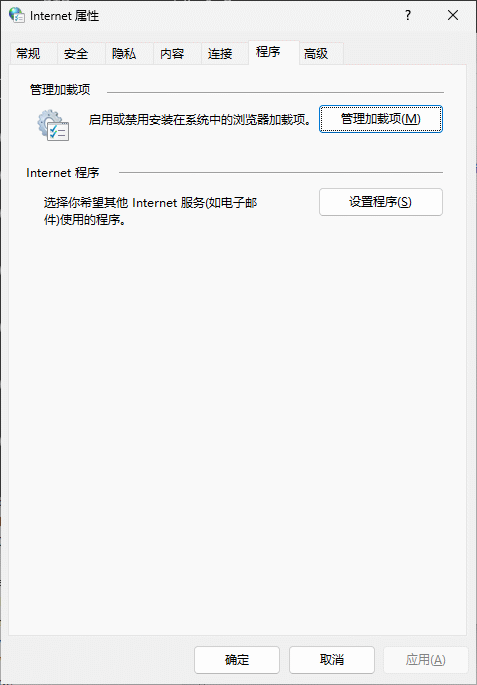
第一步启用Internet Explorer浏览器支持, 毕竟Windows 10之后默认是直接启用船新浏览器Edge了. 首选我们需要禁用IEtoEdge BHO, 打开开始菜单,输入inetcpl.cpl

打开Internet属性, 在标签中点击 程序 点击 管理加载项
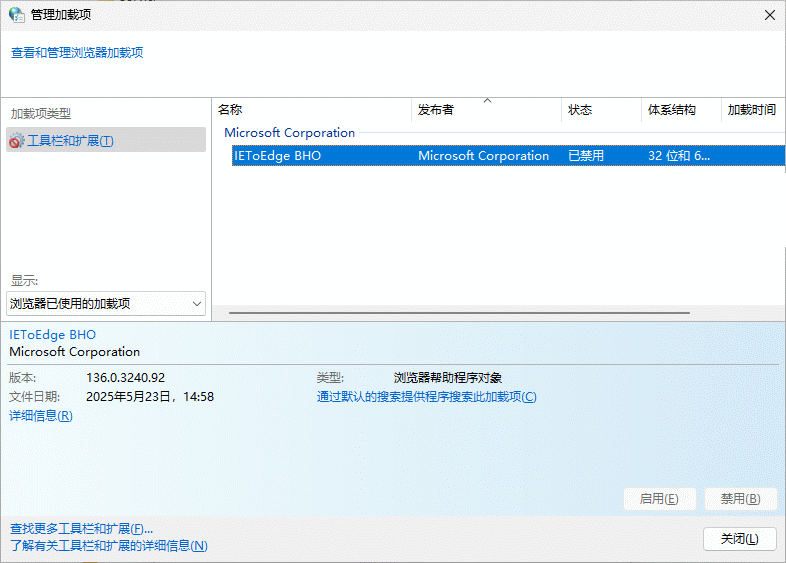
进入可以看到浏览器已使用的加载项 IEtoEdge BHO, 它会打开IE的时候会强制跳转到Edge浏览器, 但是该加载项的启用和禁用状态是无法点击的.

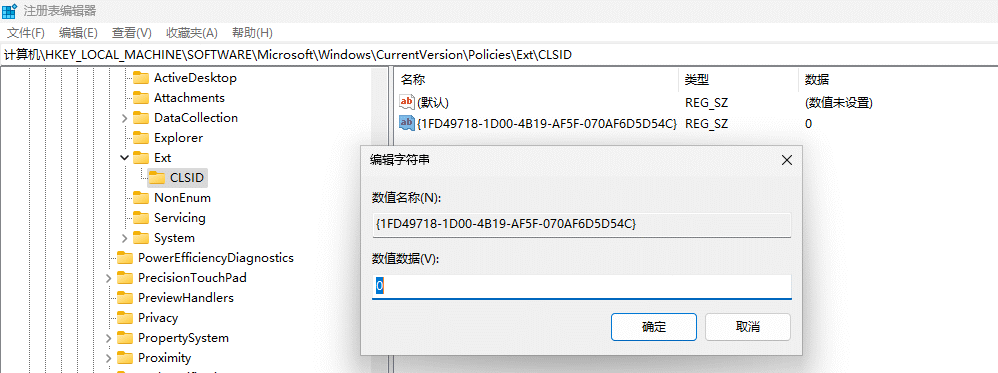
我们需要修改注册表使其禁用, 打开开始菜单,输入regedit,选择以管理员身份打开
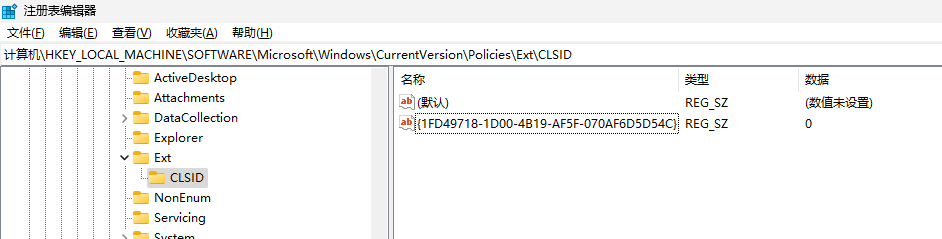
找到 HKEY_LOCAL_MACHINE\SOFTWARE\Microsoft\Windows\CurrentVersion\Policies\Ext\CLSID 项, 打开 {1FD49718-1D00-4B19-AF5F-070AF6D5D54C} 的数值, 将数值数据更改为 0, 接着可以关闭注册表编辑器.
这时回到管理加载项中, 就可以看到IEtoEdge BHO的状态为已禁用.
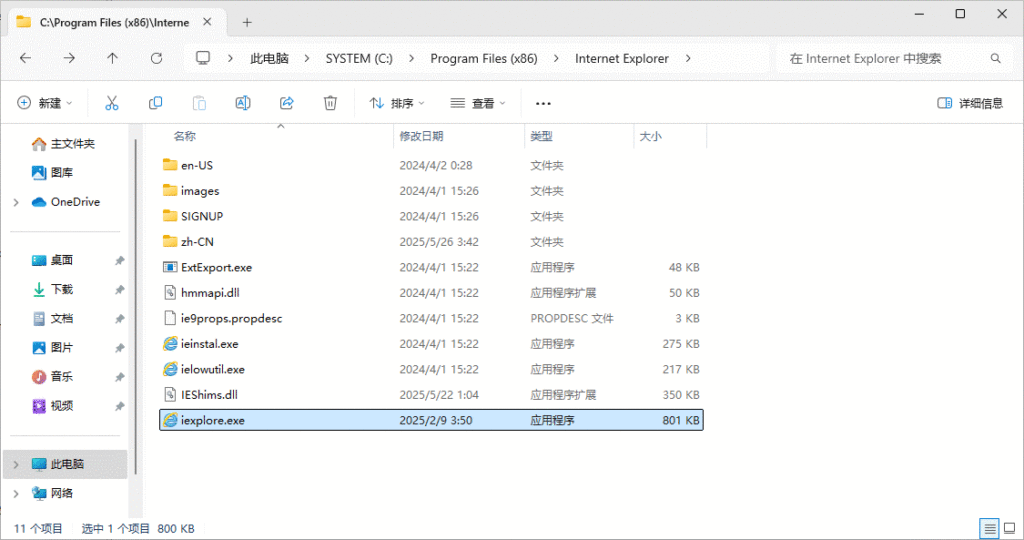
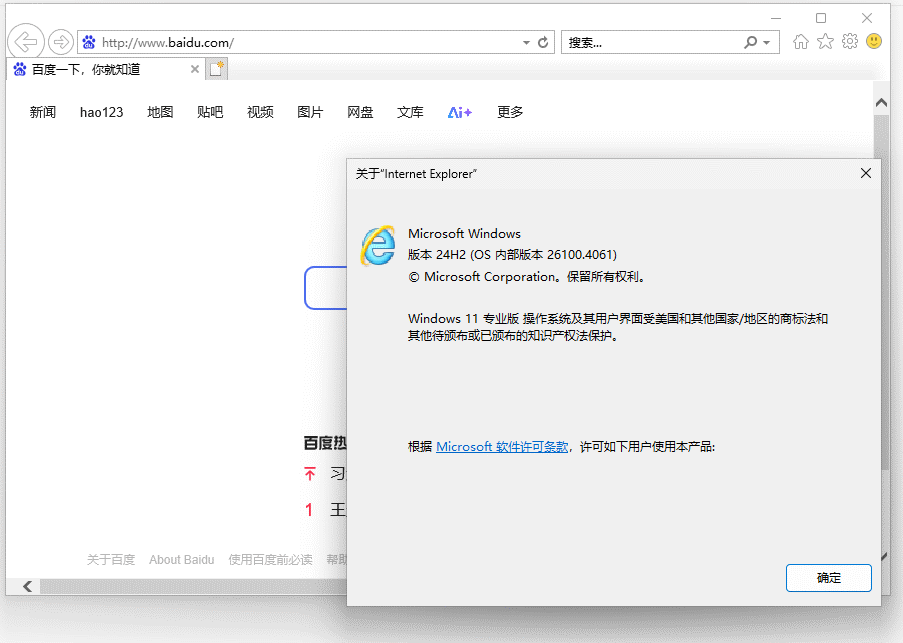
这样就可以启动IE浏览器了, 接着找到IE浏览器 打开C盘 C:\Program Files (x86)\Internet Explorer 文件夹, 双击iexplore.exe,如果正常打开IE浏览器,可以正常使用
如果依然强行跳转至Edge浏览器, 需要尝试另一个方法, 使用VBS脚本启动IE浏览器. 回到桌面上,创建一个文本文件并输入 CreateObject(“InternetExplorer.Application”).Visible=true
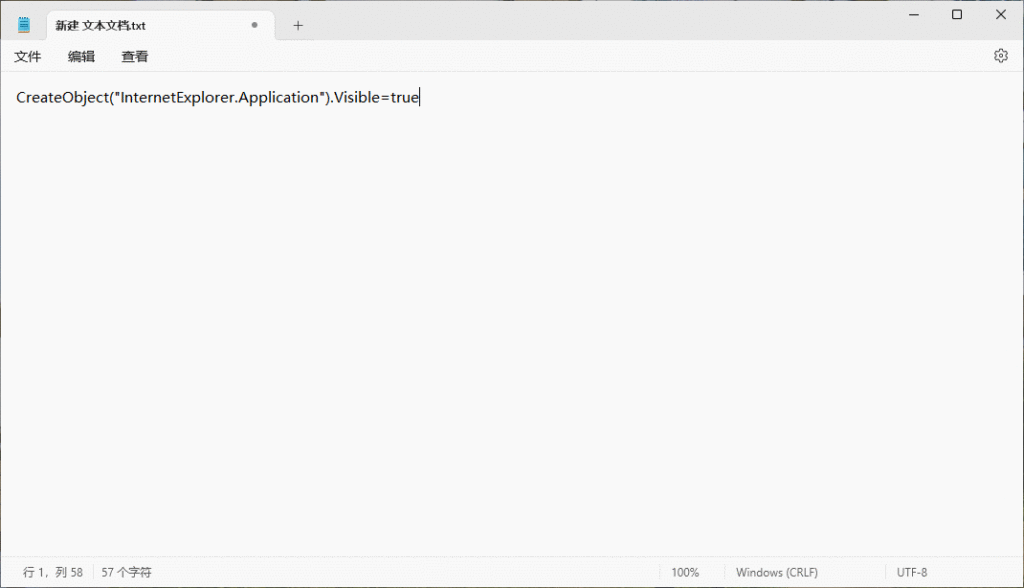
然后另存为VBS脚本, 比如 InternetExplorer.vbs
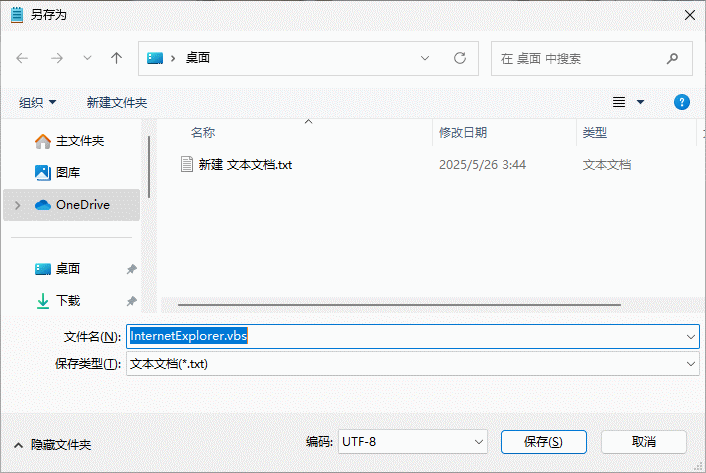
找到刚才保存的VBS的脚本, 并双击即可启动内置的IE浏览器
第二步我们需要安装Java SE运行环境, 这里选择古老的Java SE Runtime Environment 7u80版本, 用Edge之类的船新浏览器打开 https://www.oracle.com/java/technologies/javase/javase7-archive-downloads.html 找到Java SE Runtime Environment 7u80版本, 然后下载 Windows x86 Offline 离线安装文件 jre-7u80-windows-i586.exe 并安装完毕.

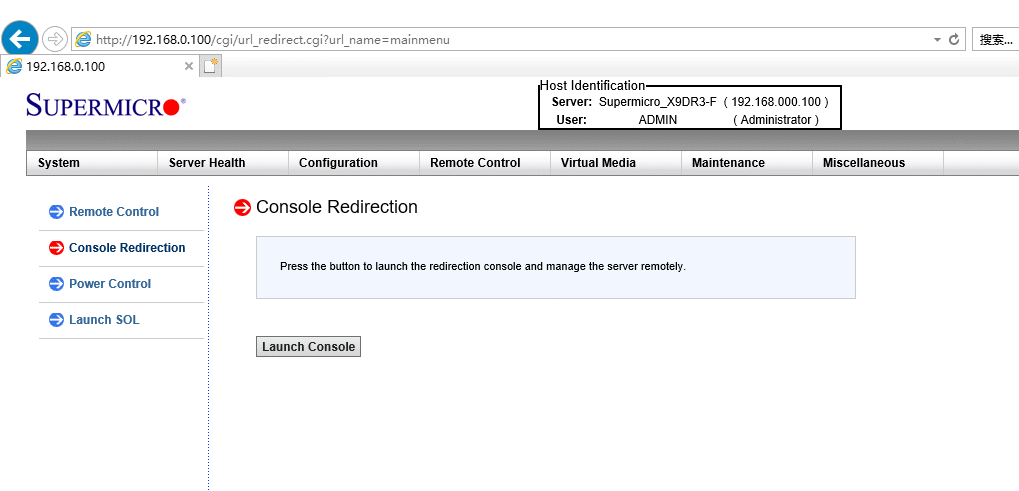
然后打开IE浏览器输入主板IPMI的对应IP, 就可以进入IPMI控制页面, 在 Remote Control 远程控制选项页的 Console Redirection 屏幕转发项就可以点击 Launch Console 执行远程控制显示.
这时候会自动下载JNLP文件使浏览器直接执行Java应用程序.
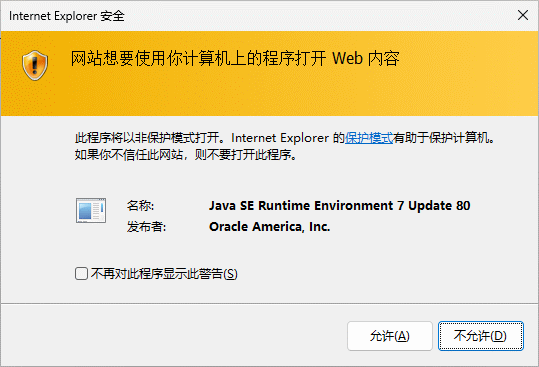
点击允许, 这是会自动下载JAVA程序, 但是由于证书过期或者未签名会弹出警告页面.
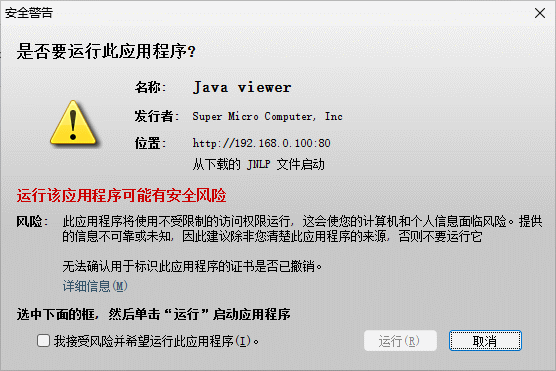
打勾 我接受风险并希望运行此应用程序, 并点击 运行
这样我们就可以进入iKVM浏览器进行远程控制了.

AIO之万兆网卡直通OpenWrt安装
AIO(All in Boom[爆炸就是艺术])现在很流行ESXI或者PVE, 我不太喜欢索性直接用Rocky Linux做宿主, 使用SSH + Cockpit Web控制台管理, 安装Rocky Linux很简单这里就不再赘述.


网卡直通这个一点不奇怪,不过大多数是用vfio-pci的ids来设置PCI设备的唯一标识符, 但是有个问题, 如果是多张卡或者多口卡那么就会全部被替代, 另外插PCIe插槽要注意, 只有PCH通道才能全部拆分IOMMU组, 如果是CPU通道, 那么大概率会跟多个设备一起被编在同一个IOMMU组.
使用命令行脚本查看IOMMU的组别情况, 如果我们要直通的设备并不是独立组, 那就无法直通了.
# for d in /sys/kernel/iommu_groups/*/devices/*; do n=${d#*/iommu_groups/*}; n=${n%%/*}; printf 'IOMMU Group %s ' "$n"; lspci -nns "${d##*/}"; done;
IOMMU Group 1 00:01.0 PCI bridge [0604]: Intel Corporation 6th-10th Gen Core Processor PCIe Controller (x16) [8086:1901] (rev 07)
IOMMU Group 1 00:01.1 PCI bridge [0604]: Intel Corporation Xeon E3-1200 v5/E3-1500 v5/6th Gen Core Processor PCIe Controller (x8) [8086:1905] (rev 07)
IOMMU Group 1 01:00.0 VGA compatible controller [0300]: NVIDIA Corporation GP108 [GeForce GT 1030] [10de:1d01] (rev a1)
IOMMU Group 1 01:00.1 Audio device [0403]: NVIDIA Corporation GP108 High Definition Audio Controller [10de:0fb8] (rev a1)
IOMMU Group 1 02:00.0 Ethernet controller [0200]: Intel Corporation 82580 Gigabit Network Connection [8086:150e] (rev 01)
IOMMU Group 1 02:00.1 Ethernet controller [0200]: Intel Corporation 82580 Gigabit Network Connection [8086:150e] (rev 01)
IOMMU Group 1 02:00.2 Ethernet controller [0200]: Intel Corporation 82580 Gigabit Network Connection [8086:150e] (rev 01)
IOMMU Group 1 02:00.3 Ethernet controller [0200]: Intel Corporation 82580 Gigabit Network Connection [8086:150e] (rev 01)
这个是插在CPU通道的情况,可以看到四口Intel 82580千兆网卡是在同一个IOMMU组, 这样就无法进行直通的, 我们在看一下插在PCH通道上的X710-DA4万兆网卡.
# for d in /sys/kernel/iommu_groups/*/devices/*; do n=${d#*/iommu_groups/*}; n=${n%%/*}; printf 'IOMMU Group %s ' "$n"; lspci -nns "${d##*/}"; done;
IOMMU Group 0 00:00.0 Host bridge [0600]: Intel Corporation Xeon E3-1200 v5/E3-1500 v5/6th Gen Core Processor Host Bridge/DRAM Registers [8086:1918] (rev 07)
...
IOMMU Group 20 0a:00.0 Ethernet controller [0200]: Intel Corporation Ethernet Controller X710 for 10GbE SFP+ [8086:1572] (rev 02)
IOMMU Group 21 0a:00.1 Ethernet controller [0200]: Intel Corporation Ethernet Controller X710 for 10GbE SFP+ [8086:1572] (rev 02)
IOMMU Group 22 0a:00.2 Ethernet controller [0200]: Intel Corporation Ethernet Controller X710 for 10GbE SFP+ [8086:1572] (rev 02)
IOMMU Group 23 0a:00.3 Ethernet controller [0200]: Intel Corporation Ethernet Controller X710 for 10GbE SFP+ [8086:1572] (rev 02)
这里可以看到0a:00.0、0a:00.1、0a:00.2、0a:00.3分别是X710-DA4的D、C、B、A, 是的PCI插槽序号正好跟光口的顺序相反, 他们的IOMMU组已经是独立的编号, 这样就可以分别直通, 记下需要直通的ID,我们这里是C、B、A三口, 即0000:0a:00.1 0000:0a:00.2 0000:0a:00.3。
建立启动脚本的dracut配置
# mkdir -p /usr/lib/dracut/modules.d/99vfio-pci
# touch /usr/lib/dracut/modules.d/99vfio-pci/module-setup.sh
# chmod +x /usr/lib/dracut/modules.d/99vfio-pci/module-setup.sh

# vi /usr/lib/dracut/modules.d/99vfio-pci/module-setup.sh
将dracut的配置代码输入进去.
#!/bin/bash
check() {
    if [ -d "/sys/module/vfio_pci" ]; then
        return 0
    else
        return 1
    fi
}

depends() {
    return 0
}

install() {
    inst_hook initqueue/start 05
    declare moddir = \${moddir}
    inst_hook pre-udev 00 "\${moddir}/vfio-pci-init-script.sh"
}
编辑自动启动脚本
# vi /usr/lib/dracut/modules.d/99vfio-pci/vfio-pci-init-script.sh
#!/bin/sh
DEVS="0000:0a:00.1 0000:0a:00.2 0000:0a:00.3"
for DEV in $DEVS; do
    echo "vfio-pci" > /sys/bus/pci/devices/$DEV/driver_override
    echo $DEV > /sys/bus/pci/drivers/vfio-pci/bind
done
modprobe -i vfio-pci
这里的DEVS填写我们需要直通的PCI插槽序号, 即之前查看IOMMU组看到的序号.
; 设置可执行
# chmod +x /usr/lib/dracut/modules.d/99vfio-pci/vfio-pci-init-script.sh
; 重新生成Linux初始内存文件系统(initramfs)
# dracut /boot/initramfs-$(uname -r).img $(uname -r) --force
重启后查看vfio_pci设备信息, 可以看到驱动已经加载成功.
# ls /sys/bus/pci/drivers/vfio-pci -l
总用量 0
lrwxrwxrwx. 1 root root    0  3月  7 22:09 0000:0a:00.1 -> ../../../../devices/pci0000:00/0000:00:1d.0/0000:0a:00.1
lrwxrwxrwx. 1 root root    0  3月  7 22:09 0000:0a:00.2 -> ../../../../devices/pci0000:00/0000:00:1d.0/0000:0a:00.2
lrwxrwxrwx. 1 root root    0  3月  7 22:09 0000:0a:00.3 -> ../../../../devices/pci0000:00/0000:00:1d.0/0000:0a:00.3
--w-------. 1 root root 4096  3月  4 23:01 bind
lrwxrwxrwx. 1 root root    0  3月  7 22:09 module -> ../../../../module/vfio_pci
--w-------. 1 root root 4096  3月  7 22:09 new_id
--w-------. 1 root root 4096  3月  7 22:09 remove_id
--w-------. 1 root root 4096  3月  7 22:09 uevent
--w-------. 1 root root 4096  3月  7 22:09 unbind
获取需要直通PCIe设备的详细信息.
# virsh nodedev-list --tree |grep pci
...
  +- pci_0000_00_1d_0
  |   +- pci_0000_0a_00_0
  |   +- pci_0000_0a_00_1
  |   +- pci_0000_0a_00_2
  |   +- pci_0000_0a_00_3
...
Dump出需要直通的设备信息, pci_0000_0a_00_3 和 pci_0000_0a_00_2, 即X710的A口和B口.
# virsh nodedev-dumpxml pci_0000_0a_00_3
<device>
  <name>pci_0000_0a_00_3</name>
  <path>/sys/devices/pci0000:00/0000:00:1d.0/0000:0a:00.3</path>
  <parent>pci_0000_00_1d_0</parent>
  <driver>
    <name>vfio-pci</name>
  </driver>
  <capability type='pci'>
    <class>0x020000</class>
    <domain>0</domain>
    <bus>10</bus>
    <slot>0</slot>
    <function>3</function>
    <product id='0x1572'>Ethernet Controller X710 for 10GbE SFP+</product>
    <vendor id='0x8086'>Intel Corporation</vendor>
    <capability type='virt_functions' maxCount='32'/>
    <iommuGroup number='23'>
      <address domain='0x0000' bus='0x0a' slot='0x00' function='0x3'/>
    </iommuGroup>
    <pci-express>
      <link validity='cap' port='0' speed='8' width='4'/>
      <link validity='sta' speed='8' width='4'/>
    </pci-express>
  </capability>
</device>

# virsh nodedev-dumpxml pci_0000_0a_00_2
<device>
  <name>pci_0000_0a_00_2</name>
  <path>/sys/devices/pci0000:00/0000:00:1d.0/0000:0a:00.2</path>
  <parent>pci_0000_00_1d_0</parent>
  <driver>
    <name>vfio-pci</name>
  </driver>
  <capability type='pci'>
    <class>0x020000</class>
    <domain>0</domain>
    <bus>10</bus>
    <slot>0</slot>
    <function>2</function>
    <product id='0x1572'>Ethernet Controller X710 for 10GbE SFP+</product>
    <vendor id='0x8086'>Intel Corporation</vendor>
    <capability type='virt_functions' maxCount='32'/>
    <iommuGroup number='22'>
      <address domain='0x0000' bus='0x0a' slot='0x00' function='0x2'/>
    </iommuGroup>
    <pci-express>
      <link validity='cap' port='0' speed='8' width='4'/>
      <link validity='sta' speed='8' width='4'/>
    </pci-express>
  </capability>
</device>
; 下载OpenWrt x86 ext4固件
# wget https://downloads.openwrt.org/releases/24.10.0/targets/x86/64/openwrt-24.10.0-x86-64-generic-ext4-combined.img.gz
; 解压缩
# gzip -d openwrt-24.10.0-x86-64-generic-ext4-combined.img.gz

gzip: openwrt-24.10.0-x86-64-generic-ext4-combined.img.gz: decompression OK, trailing garbage ignored

; 将img镜像转换成qcow2硬盘镜像
# qemu-img convert -p -f raw -O qcow2 openwrt-24.10.0-x86-64-generic-ext4-combined.img openwrt-24.10.0-x86-64-generic-ext4-combined.qcow2

; 修改容量到20G
# qemu-img resize openwrt-24.10.0-x86-64-generic-ext4-combined.qcow2 20G
; 填充扩展容量到真实大小
# qemu-img resize -f raw openwrt-24.10.0-x86-64-generic-ext4-combined.qcow2 20G
编写XML openwrt.xml 来定义一台新的虚拟机.
# vi openwrt.xml
<domain type='kvm'>
    <name>openwrt_default_gateway</name>
    <memory unit='MiB'>2048</memory>
    <currentMemory unit='MiB'>2048</currentMemory>
    <vcpu>2</vcpu>
    <os>
        <type arch='x86_64' machine='pc-i440fx-8.2'>hvm</type>
        <boot dev='hd'/>
    </os>
    <features>
        <acpi/>
        <apic/>
    </features>
    <clock offset='utc'/>
    <on_poweroff>destroy</on_poweroff>
    <on_reboot>restart</on_reboot>
    <on_crash>destroy</on_crash>
    <devices>
        <emulator>/usr/bin/qemu-system-x86_64</emulator>
        <disk type='file' device='disk'>
            <driver name='qemu' type='qcow2'/>
            <source file='/data/libvirt/disk/openwrt-24.10.0-x86-64-generic-ext4-combined.qcow2'/>
            <target dev='vda' bus='virtio'/>
        </disk>
        <hostdev mode='subsystem' type='pci' managed='yes'>
            <driver name='vfio'/>
            <source>
                <address domain='0x0000' bus='0x0a' slot='0x00' function='0x3'/>
            </source>
        </hostdev>
        <hostdev mode='subsystem' type='pci' managed='yes'>
            <driver name='vfio'/>
            <source>
                <address domain='0x0000' bus='0x0a' slot='0x00' function='0x2'/>
            </source>
        </hostdev>
        <interface type='network'>
            <source network='v10gswitch'/>
            <model type='virtio'/>
        </interface>
        <controller type='usb' index='0'>
            <address type='pci' domain='0x0000' bus='0x00' solt='0x02' function='0x0'/>
        </controller>
        <input type='mouse' bus='ps2'/>
        <controller type='ide' index='0'>
            <address type='pci' domain='0x0000' bus='0x00' solt='0x01' function='0x0'/>
        </controller>
        <graphics type='vnc' port='-1' autoport='yes' listen='0.0.0.0'>
            <listen type='address' address='0.0.0.0'/>
        </graphics>
    </devices>
</domain>
创建虚拟机
# virsh define openwrt.xml
由于X710的驱动i40e在OpenWrt默认是没有的, 需要手动下载并拷贝进虚拟机, 否则因为没网络而无法继续.
# wget https://downloads.openwrt.org/releases/24.10.0/targets/x86/64/kmods/6.6.73-1-a21259e4f338051d27a6443a3a7f7f1f/kmod-i40e_6.6.73-r1_x86_64.ipk
拷贝 i40e 驱动到虚拟机中
# virt-copy-in -d openwrt_default_gateway kmod-i40e_6.6.73-r1_x86_64.ipk /root
; 如果提示 bash: virt-copy-in:未找到命令 则安装软件包.
# dnf install -y libguestfs-tools
; 如果提示 libguestfs: error: stat: /usr/libexec/qemu-kvm: 没有那个文件或目录 则做一下软连接.
# ln -s $(which qemu-kvm) /usr/libexec/qemu-kvm
在虚拟机中运行
# opkg kmod-i40e_6.6.73-r1_x86_64.ipk
在虚拟机中运行自动扩容脚本, OpenWrt官网有详细介绍, 见 https://openwrt.org/docs/guide-user/advanced/expand_root
# 直接配置自动扩容脚本
cat << "EOF" > /etc/uci-defaults/70-rootpt-resize
if [ ! -e /etc/rootpt-resize ] \
&& type parted > /dev/null \
&& lock -n /var/lock/root-resize
then
ROOT_BLK="$(readlink -f /sys/dev/block/"$(awk -e \
'$9=="/dev/root"{print $3}' /proc/self/mountinfo)")"
ROOT_DISK="/dev/$(basename "${ROOT_BLK%/*}")"
ROOT_PART="${ROOT_BLK##*[^0-9]}"
parted -f -s "${ROOT_DISK}" \
resizepart "${ROOT_PART}" 100%
mount_root done
touch /etc/rootpt-resize
reboot
fi
exit 1
EOF
cat << "EOF" > /etc/uci-defaults/80-rootfs-resize
if [ ! -e /etc/rootfs-resize ] \
&& [ -e /etc/rootpt-resize ] \
&& type losetup > /dev/null \
&& type resize2fs > /dev/null \
&& lock -n /var/lock/root-resize
then
ROOT_BLK="$(readlink -f /sys/dev/block/"$(awk -e \
'$9=="/dev/root"{print $3}' /proc/self/mountinfo)")"
ROOT_DEV="/dev/${ROOT_BLK##*/}"
LOOP_DEV="$(awk -e '$5=="/overlay"{print $9}' \
/proc/self/mountinfo)"
if [ -z "${LOOP_DEV}" ]
then
LOOP_DEV="$(losetup -f)"
losetup "${LOOP_DEV}" "${ROOT_DEV}"
fi
resize2fs -f "${LOOP_DEV}"
mount_root done
touch /etc/rootfs-resize
reboot
fi
exit 1
EOF
cat << "EOF" >> /etc/sysupgrade.conf
/etc/uci-defaults/70-rootpt-resize
/etc/uci-defaults/80-rootfs-resize
EOF
; 或者用wget获取自动扩容脚本
# wget -U "" -O expand-root.sh "https://openwrt.org/_export/code/docs/guide-user/advanced/expand_root?codeblock=0"
; 执行扩容脚本
# . ./expand-root.sh
; 安装需要的软件包
# opkg update
# opkg install parted losetup resize2fs
; 开始进行扩容, 这时候会自动重启, 等待扩容完毕即可.
# sh /etc/uci-defaults/70-rootpt-resize
至此OpenWrt已经创建完毕, 剩下就是更新源、安装简体中文语言支持以及安装需要的功能了.
# opkg update
# opkg install luci-i18n-base-zh-cn install luci-i18n-package-manager-zh-cn

; WOL网卡唤醒APP
# opkg install luci-i18n-wol-zh-cn

; 络流量监视器,它使用内核提供的网络接口统计信息
# opkg install luci-i18n-vnstat2-zh-cn

; 通用即插即用UPnP(端口自动转发)
# opkg install luci-i18n-upnp-zh-cn

; BT下载工具
# opkg install luci-i18n-transmission-zh-cn

; 流量监控工具
# opkg install luci-i18n-statistics-zh-cn

; 网络共享(Samba4)
# opkg install luci-i18n-samba4-zh-cn

; MWAN3负载均衡
# opkg install luci-i18n-mwan3-zh-cn

; 网页文件管理器
# opkg install luci-i18n-filebrowser-zh-cn

; 动态域名 DNS
# opkg install luci-i18n-ddns-zh-cn

; Aria2下载工具
# opkg install luci-i18n-aria2-zh-cn

; BanIP
# opkg install luci-i18n-banip-zh-cn
最后秀一把深水宝的双模光模块。

超微X9DR3-F、X11SSH-LN4F主板开机执行自定义风扇PWM脚本
想要通过IPMI自定义风扇转速, 首先需要设置成Full模式, 进入IPMI设置界面, 在 Configuration 菜单下的 Fan Mode 设置成 Full 模式.

X9DR3-F的配置风扇风扇转速设置指令
; fan1-6的PWM设置指令, 设置范围是0到255, 这里的 0x6f 是 111 即 43.5%.
# ipmitool raw 0x30 0x91 0x5A 0x3 0x10 0x6f

; fana-b的PWM设置指令, 设置范围是0到255, 这里的 0x9f 是 159 即 62.3%.
# ipmitool raw 0x30 0x91 0x5A 0x3 0x11 0x9f
X11SSH-LN4F的配置风扇风扇转速设置指令
; fan1-4的PWM设置指令, 设置范围是0到100, 这里的 0x3c 即 60%.
# ipmitool raw 0x30 0x70 0x66 0x01 0x00 0x3c

; fana的PWM设置指令, 设置范围是0到100, 这里的 0x3c 即 60%.
# ipmitool raw 0x30 0x70 0x66 0x01 0x01 0x3c
以上就是IPMI直接设置风扇的调速指令, 现在建立一个服务使其开机自动设置.
$ sudo vi /etc/systemd/system/adjust-fanpwm.service
[Unit]
Description=Power on automatically adjusts fan PWM Service
After=network.target

[Service]
Type=simple
# fan1-6
# ipmitool raw 0x30 0x91 0x5A 0x3 0x10 0x6f
# fana-b
# ipmitool raw 0x30 0x91 0x5A 0x3 0x11 0x9f
ExecStart=/bin/bash -c 'sudo ipmitool raw 0x30 0x91 0x5A 0x3 0x10 0x6f && sudo ipmitool raw 0x30 0x91 0x5A 0x3 0x11 0x9f'
Restart=on-failure

[Install]
WantedBy=multi-user.target
设置成开机自动启动
$ sudo systemctl enable adjust-fanpwm.service
执行开机调节风扇PWM服务
$ sudo systemctl start adjust-fanpwm.service
查看执行情况
$ sudo systemctl status adjust-fanpwm.service
Android系统版本与API版本对照表
一、各个版本号对比
| Linux内核版本 | Android系统版本号 | API版本号 | 版本代号 | 发布日期 |
| / | Android-1.0 | 1 | / | 2008-09-23 |
| / | Android-1.1 | 2 | / | 2009-02-02 |
| 2.6.27 | Android-1.5 | 3 | Cupcake / 纸杯蛋糕 | 2009-04-30 |
| 2.6.29 | Android-1.6 | 4 | Donut / 甜甜圈 | 2009-09-15 |
| Android-2.0 | 5 | Eclair / 闪电泡芙 | 2009-10-26 | |
| Android-2.0.1 | 6 | 2009-12-03 | ||
| Android-2.1 | 7 | 2010-01-12 | ||
| 2.6.32 | Android-2.2 | 8 | Froyo / 冻酸奶 | 2010-05-20 |
| Android-2.2.1 | 2011-01-18 | |||
| Android-2.2.2 | 2011-01-22 | |||
| Android-2.2.3 | 2011-11-21 | |||
| 2.6.35 | Android-2.3 | 9 | Gingerbread / 姜饼 | 2010-12-07 |
| Android-2.3.1 | 2010-12 | |||
| Android-2.3.2 | 2011-01 | |||
| Android-2.3.3 | 10 | 2011-02-09 | ||
| Android-2.3.4 | / | |||
| Android-2.3.5 | 2011-07-25 | |||
| Android-2.3.6 | 2011-09-02 | |||
| Android-2.3.7 | / | |||
| 2.6.36 | Android-3.0 | 11 | Honeycomb / 蜂巢 | 2011-02-02 |
| Android-3.1 | 12 | 2011-05-10 | ||
| Android-3.2 | 13 | 2011-07-15 | ||
| Android-3.2.1 | 2011-09-20 | |||
| Android-3.2.2 | 2011-08-30 | |||
| 3.0.1 | Android-4.0 | 14 | Ice Cream Sandwich / 冰淇淋三明治 | 2011-10-19 |
| Android-4.0.1 | 2011-10 | |||
| Android-4.0.2 | 2011-11-28 | |||
| Android-4.0.3 | 15 | 2011-12-16 | ||
| Android-4.0.4 | 2012-02-06 | |||
| 3.0.31 | Android-4.1 | 16 | Jelly Bean / 果冻豆 | 2012-06-28 |
| Android-4.1.1 | 2012-07-23 | |||
| Android-4.1.2 | 2012-10-09 | |||
| 3.4.0 | Android-4.2 | 17 | 2012-10-30 | |
| Android-4.2.1 | 2012-11 | |||
| Android-4.2.2 | 2013-02-11 | |||
| 3.4.39 | Android-4.3 | 18 | 2013-07-25 | |
| Android-4.3.1 | 2013-10-05 | |||
| 3.10 | Android-4.4 | 19 | KitKat / 奇巧巧克力棒 | 2013-10-31 |
| Android-4.4.1 | 2013-12-05 | |||
| Android-4.4.2 | 2013-12-09 | |||
| Android-4.4.3 | 2014-06-02 | |||
| Android-4.4.4 | 2014-06-20 | |||
| Android-4.4W | 20 | 2014-06 | ||
| 3.16.1 | Android-5.0 | 21 | Lollipop / 棒棒糖 | 2014-06-25 |
| Android-5.0.1 | 2014-12-04 | |||
| Android-5.0.2 | 2014-12-21 | |||
| Android-5.1 | 22 | 2015-03-10 | ||
| Android-5.1.1 | 2015-04-22 | |||
| 3.18.10 | Android-6.0 | 23 | Marshmallow / 棉花糖 | 2015-10-05 |
| Android-6.0.1 | 2015-12-07 | |||
| 4.4.1 | Android-7.0 | 24 | Nougat / 牛轧糖 | 2016-08-22 |
| Android-7.1 | 25 | 2016-10-21 | ||
| Android-7.1.1 | 2016-12-05 | |||
| Android-7.1.2 | 2017-04-04 | |||
| 4.9 | Android-8.0 | 26 | Oreo / 奥利奥 | 2017-08-21 |
| Android-8.1 | 27 | 2017-12-06 | ||
| 4.14 | Android-9.0 | 28 | Pie / 馅饼 | 2018-08-06 |
| / | Android-10 | 29 | Q | 2019-09-03 |
| / | Android-11 | 30 | Red Velvet Cake / 红色天鹅绒蛋糕 | 2020-09-08 |
| 5.10 | Android-12 | 31 | Snow cone / 杯套装碎冰 | 2021-10-04 |
| / | Android-12L | 32 | 2022-03-08 | |
| 5.15 | Android-13 | 33 | Tiramisu / 提拉米苏 | 2022-05-12 |
| 6.1 | Android-14 | 34 | Upside Down Cake / 翻转蛋糕 | 2023-10-04 |
| 6.6 | Android-15 | 35 | Vanilla Ice Cream / 香草冰淇淋 | (AOSP 实验版)(2024) |
二、特殊部分说明
1、Android系统在1.0发版前,有两个内测版本,代号分别是:铁臂阿童木(Astro)和机器人班亭(Bender)
2、Android系统1.0和1.1版本并没有特殊的名称代号,因此没有名字
3、Android-1.5开始采用正式代号名称,以甜品命名,首字母从C开始依次递增
4、Android-4.4W是单独的一个版本,主要是用于穿戴设备
5、Android-12L也是一个单独的版本,主要是用于折叠式设备和大屏幕设备
6、Android-10的代号不是甜点,是字母Q,可能是找不到甜点名称了
7、发布日期均指正式版发行日期,部分版本发行日期只能追溯到月,无法追溯到具体时间了
文章摘抄至 https://security.blog.csdn.net/article/details/125295711 , https://apilevels.com/
新安装的Windows 7系统,Windows Update无法更新,提示错误代码80072EFE
全新安装的在Windows 7 SP1系统中,自动更新功能是保持系统安全性和稳定性的关键。然而,许多用户在尝试更新时可能会遇到错误代码80072EFE,这通常意味着更新过程中出现了网络通信问题。实际上,这一错误往往与系统缺少必要的补丁或更新机制遇到障碍有关。
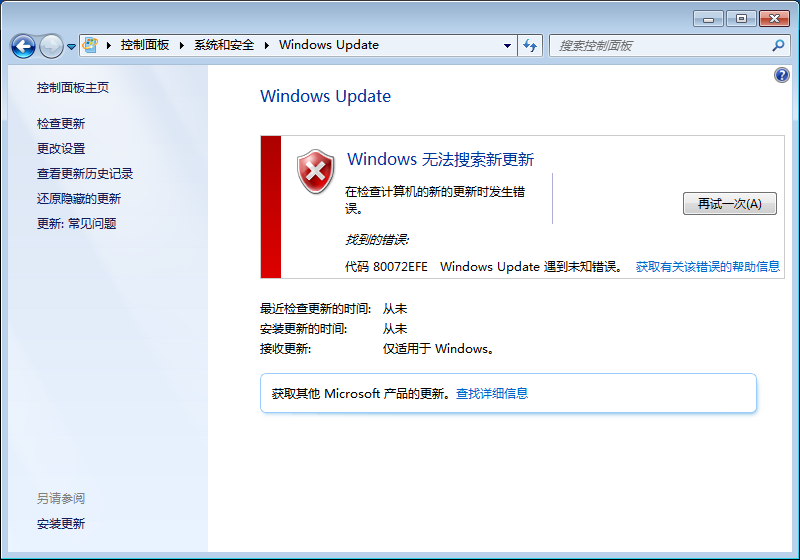
先手动下载KB3020369,KB3125574这两个补丁:
KB3020369补丁 64位
https://www.microsoft.com/zh-CN/download/details.aspx?id=46817
KB3020369补丁 32位
https://www.microsoft.com/zh-CN/download/details.aspx?id=46827
KB3125574补丁 64位
https://download.windowsupdate.com/d/msdownload/update/software/updt/2016/05/windows6.1-kb3125574-v4-x64_2dafb1d203c8964239af3048b5dd4b1264cd93b9.msu
KB3125574补丁 32位
https://download.windowsupdate.com/d/msdownload/update/software/updt/2016/05/windows6.1-kb3125574-v4-x86_ba1ff5537312561795cc04db0b02fbb0a74b2cbd.msu
或者直接从Update服务器搜索下载
https://www.catalog.update.microsoft.com/Search.aspx?q=KB3020369
https://www.catalog.update.microsoft.com/Search.aspx?q=KB3125574
先安装KB3020369重启后在安装KB3125574继续重启,然后再开始菜单点Windows Update,检查更新
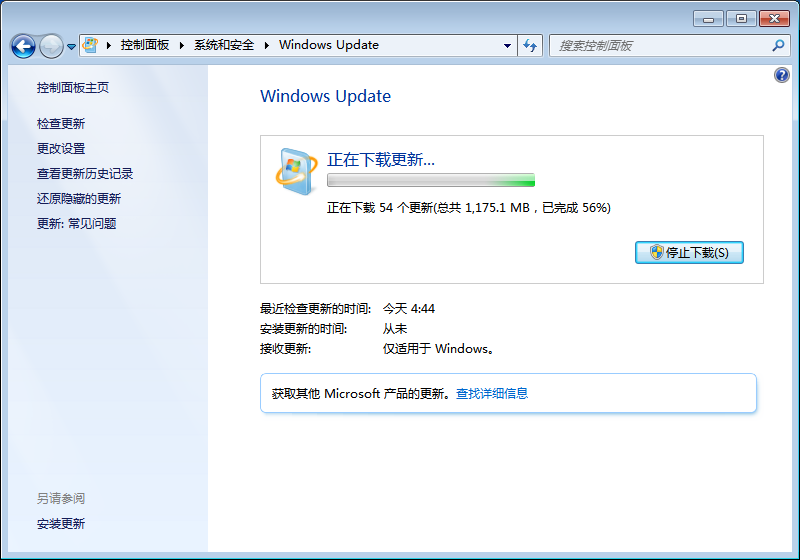
一切多么美好, 完结.
docker容器内debian系统配置国内镜像源
1. 进入 docker 容器
$ docker exec -it 4a21b5ee9275 /bin/bash
2. 查看debian系统版本
# cat /etc/os-release
PRETTY_NAME="Debian GNU/Linux 11 (bullseye)"
NAME="Debian GNU/Linux"
VERSION_ID="11"
VERSION="11 (bullseye)"
VERSION_CODENAME=bullseye
ID=debian
HOME_URL="https://www.debian.org/"
SUPPORT_URL="https://www.debian.org/support"
BUG_REPORT_URL="https://bugs.debian.org/"
3. 确认版本后配置国内镜像源(本例版本代号为bullseye)
# echo "deb http://mirrors.aliyun.com/debian bullseye main" >/etc/apt/sources.list
# echo "deb http://mirrors.aliyun.com/debian-security bullseye-security main" >>/etc/apt/sources.list
# echo "deb http://mirrors.aliyun.com/debian bullseye-updates main" >>/etc/apt/sources.list